Blender 3D is a free program for 3D graphics and animation. The computer software is available for Windows, OS X and Linux/Unix. Blender was started in 1995 and since then, it has aimed to provide an industrial-strength alternative, free of charge. Schools and Universities use it for multimedia production, product design, architectural visualization, scientific research etc. It is also commonly used by 3D Artists to create 3D NFT arts and animations, by video game and AR developers for designing scenes, characters and create 3D web embeds and iframe 3D models optimized for Augmented Reality (AR). Blender has the capability to create 3D web embeds and iframe 3D models optimized for upload on p3d.in and for other Augmented Reality (AR) applications.
The GL Transmission Format (glTF) is a 3D file format developed by the Khronos Group. It's intended to be a common, extensible format that can be used to transmit and load 3D models in web and native applications. glTF helps reduce 3D model sizes and reduces the runtime processing required to unpack before rendering those models.
The glTF format was initially released in May 2015, with the version 1.0 specification being released in July 2015. The format is based on the JSON geometry format, and its development was led by Autodesk, Microsoft, and Mozilla members. It's supported by 3D engines such as Unreal Engine 4, Unity3D, and Godot.
If you are launching a freshly installed Blender, you will be asked to select a preferred language and customize your shortcut keys and color scheme based on your preference. After saving your new settings options, you are presented with Workspace options where you can choose amongst the general "Layout", "3D", "Sculpting", "2D", "Vfx", "Video Editing", "Rendering" etc. or create a customized one to suit your need.
Select "Layout" for a traditional comprehensive workspace where you can do anything from creating simple and complex 3D models to adding materials, textures, animating and exporting. You can shuffle between other workspaces at the time of their need such as selecting "Rendering" when you need to work on your model rendered view.
At the center of the screen, you have the "Viewport" where you can rotate, pan around and view your 3D model in different perspectives and angles in real-time.
At the very bottom of your display, there is a bar where information of what your mouse can do based on the position of the cursor at every given time is shown. The "Quick Tools Menu" is located at the left side of the screen and this is where you have quick access to tools such as "Select", "Move", "Rotate", "Scale" used to navigate and manipulate your 3D scene on the Viewport. At the bottom of the Viewport, you have the "Timeline". This is where you control the playback of your animation, and create and animate keyframes.
"Scene Specific Properties" are a set of icons located at the left end of the panel on the right side of the screen. This is where you will find options such as "Render", "Output Settings", "View Layer Tab", "Particles", "Material", "Object" etc., and the "General Scene Tab" where you will find options such as "Active camera", "Units" and "Rigid Body Settings".
To populate your scene, you can start by importing 3D objects by choosing from the pre-made geometry shapes such as "box", "cylinder", "sphere" etc., or start by creating a Mesh Plane and building on it. To create a Mesh Plane, press the Shift Key + A, and select "Plane" under "Mesh" from the options displayed. You can modify the plane as you wish with the many options available in the "Add Modifier" tab on the right side of the screen.
To create a cube, press "Shift Key + A" and select "Cube" from the options. You can adjust the size of your cube, rotate, and pan around it by using the options from the "Quick Tools Menu" on the left of your screen. You can modify your shapes however you like by exploring the numerous options available in the "Add Modifier" tab on the right side of the screen. Options available in the "Add Modifier" can be used to alter the thickness, sharpness, height or width of your plane or model, join or subtract shapes etc., to create a form you are happy with.
After creating your 3D model, you can go ahead, add materials, texture, and alter the lighting. To add materials to your 3D model, select your object or multiple faces of the object, navigate to the "Properties Editor" and click on the object button and click on "Materials" in the Properties Editor tab. In the Materials tab, click the "Plus" sign "+" to add materials or select from the list of available material presets in Blender. You can rename the new material as desired for proper documentation and easy recognition of materials used in the course of your project. Click "Assign" and that should complete the process of material application.
To add texture, Navigate to the Materials tab, Look for the "surface" section, and under "Base Color", find the yellow dot. Click on it, and from the new options displayed, choose "Image Texture." A file explorer should open; if it does not, click on "New" to create one. Locate and import your chosen texture file. To view the texture on your model in real-time, ensure "Texture View" is enabled in the Viewport. To do this, Click on one of the four spheres found at the top right corner of the Viewport to change the way it displays the scene. Choose either "Look Dev" or "Rendered" to be able to see a texture.
To specify how a texture is mapped to an object, you can work in the UV/Image Editor viewport in Blender, telling the program exactly how to display the image on the faces of the object. To texture your object, the first thing you want to do is unwrap it. This basically flattens out the 3D object and turns its surface into a 2D plane, which allows you to put a texture on it. To "unwrap" an object, change the Viewport to "Edit Mode" select your object on the Viewport and press the "U" key on your keyboard and select "Unwrap".
You can use your 3D application's exporter to generate a suitable glTF file and upload the model to p3d.in, you can upload any number of files with a size of up to 300 MB.
p3d.in supports a wide range of 3D file formats including:
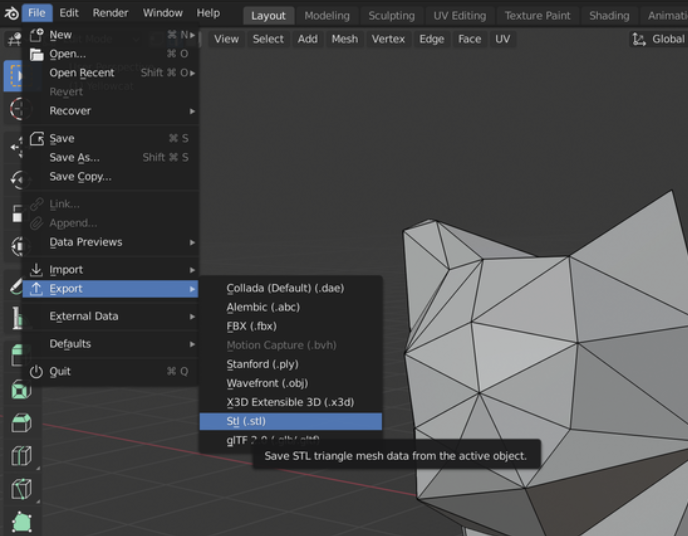
To export your 3D model in .obj format, select your model, navigate to the Menu Bar and click "File", then "Export", and select "Wavefront (.obj)" from the list of file formats displayed. Expand the "Export OBJ" panel on the left side of the Export window. Set Scale to 100.00 and make sure all other settings are set to their default values. Then click on "Export OBJ".
Now that your 3D model has been exported, you can go ahead and upload it on p3d.in.
To export your 3D model as .glb/glTF, follow the same step described above by clicking on "File" on the "Menu Bar" and from the lists of file format options presented when you click "Export", select "glTF 2.0 (.glb/.gltf)".There are some restrictions on the export of the glTF format. You can export transparent plastic material by using the diffuse color only.
When you export a glTF model from this application, you can import it into any other application that supports the glTF format, such as the p3d.in 3D model hosting and visualization framework.
Unit size: If a scene is not utilizing scene units, it is best to set the unit size because it tells the program how big your geometry should be in real-life measurements.
The texture resolution in dpi: Texture resolution in dots per inch (dpi) varies for each part. The higher the dpi, the crisper your textures will be. However, your file size will also increase if you use a large dpi.
Ambient occlusion: The baked texture will include it when you turn on ambient occlusion.
Use Draco to compress the geometry: Compressing a scene using Draco will significantly reduce the file size of the geometry but will not affect texture quality.
The number of samples: A low value will result in an image containing excessive amounts of noise. Raising the value of a commodity increases its time to export it.
Please choose only one option (Geometry Nodes or Textures): It is impossible to apply both Geometry nodes (bubbles, flakes, displacement) and textures on a single part. This decision will determine whether you prioritize the effects of one type over another.
glTF is a 3D model format for the web. It supports a variety of assets that are commonly used to create game assets, like meshes and textures. Assets in glTF can be rendered directly in a browser without needing any additional processing. For example, if you went to a website that uses glTF and clicked on a model, your browser would open up the 3D program that it came from, like Blender, and load the file for you.
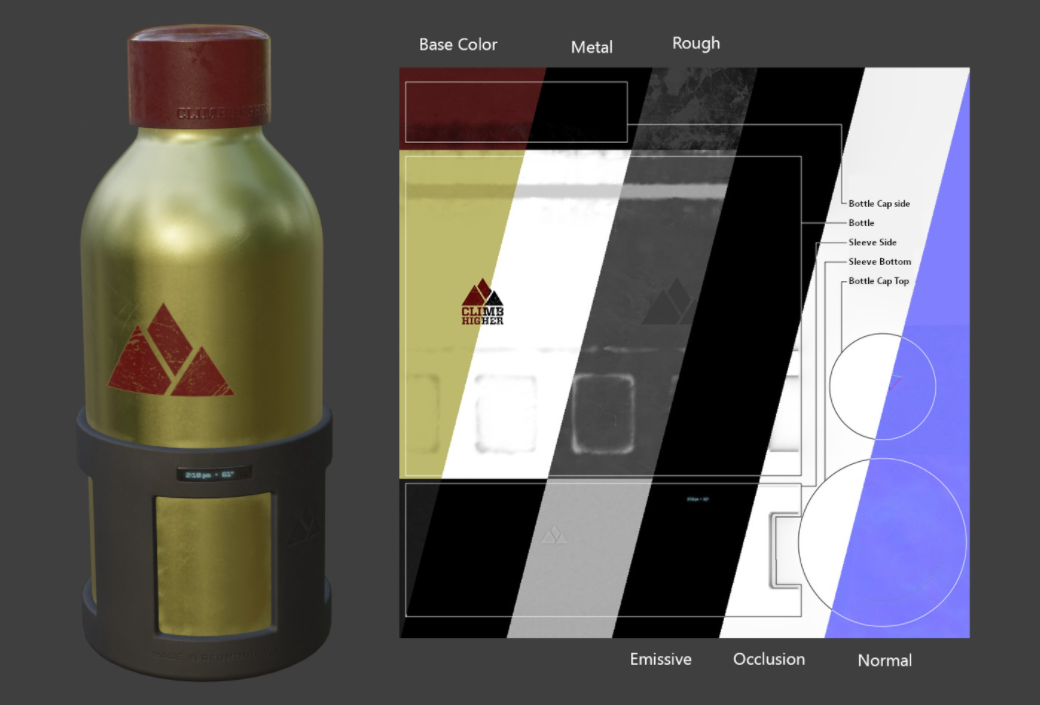
The glTF core material system supports a metal PBR workflow. It has the following information channels:

Blender's own materials are different from the glTF material system. The main reason for this is that Blender's own materials are for the Cycles rendering engine, whereas the glTF material system is for the WebGL renderer. However, because some of the features in the glTF material system aren't supported in WebGL, a fallback material is used instead in those cases.
The exporter supports core glTF materials and KHR_materials_unlit materials. It constructs glTF material based on the Blender recognized nodes.
When you're modeling a 3D object with Blender, there are two ways to determine the color of a surface. To model with accurate colors, you should use a texture map that defines the colors for each part of the model. However, if you want to visualize the object in different colors than it will be painted in the end, you can use a Color node and define the color of each part directly in your scene file by using a node system like a Principled BSDF node.

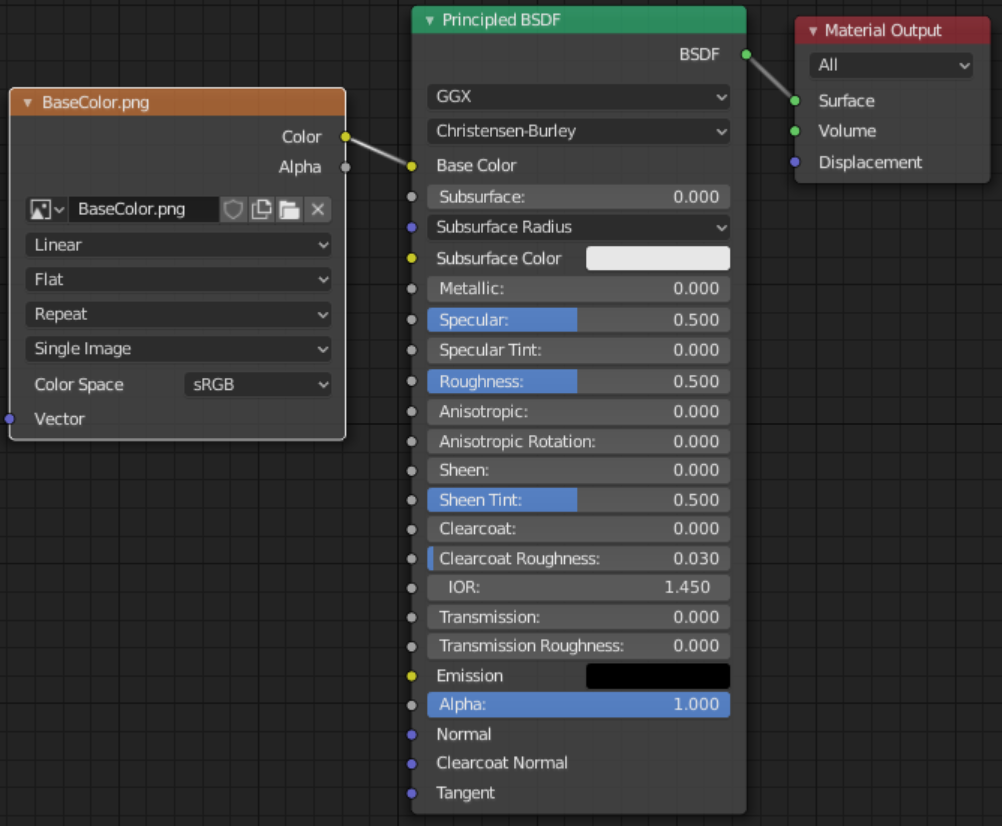
The BSDF node is a built-in function that calculates the metallic and roughness values from a given color, light's direction, and surface normal.
These values are read from the Principled BSDF node. When importing the metallic and roughness of a Material from a glTF, it's important to ensure that the inputs are not left unconnected. If they are, users may be able to control their values freely as if they were sliders by dragging them with the mouse. This can cause unexpected changes in rendering.
Metallic and roughness are two of the more commonly used material properties in Blender. Think about how wet a kitchen knife feels or how smooth a blade that's just been sharpened feels. Metallic is similar to the kitchen knife; roughness is identical to the sharpened knife. Both can be adjusted independently, enabling you to create various materials within Blender (e.g., a shiny plastic or rough metal).
What happens if you set both metallic and roughness to 0? The material will appear black (because it's absorbing all light-not reflecting it at all).
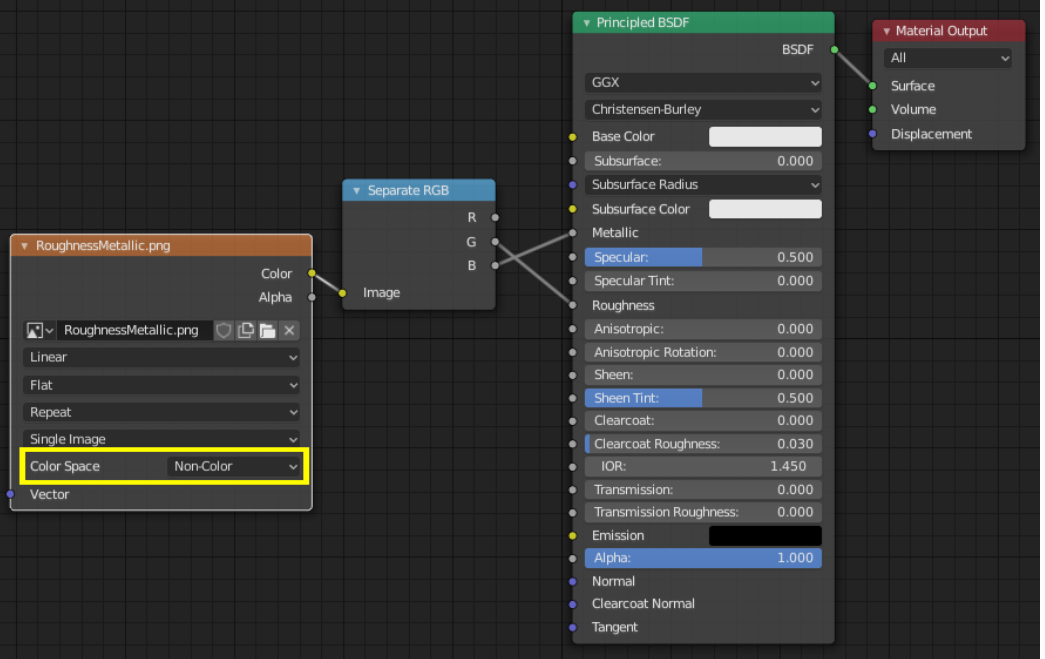
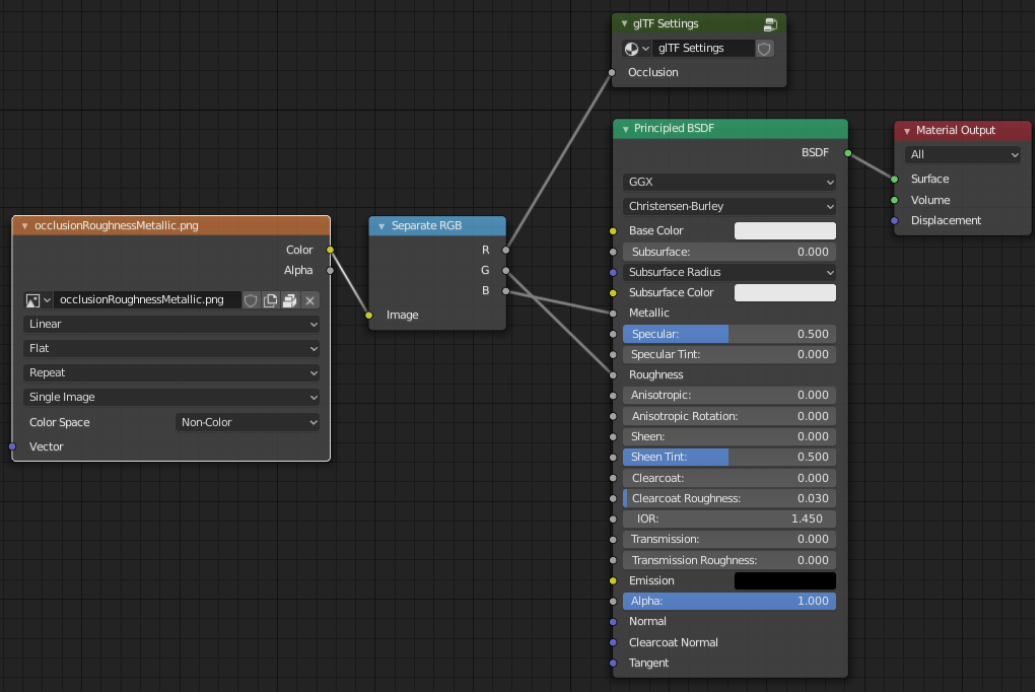
If you want to follow the glTF standard for image textures, it's recommended that you separate the RGB channels of an Image Texture node and use a Separate RGB node to send the green (G) channel to roughness and the blue (B) channel to Metallic. The glTF exporter recognizes the arrangement as matching the standard, and it will copy the texture into the glTF file during export. The Image Texture node needs to have Non-Color set as its Color Space.
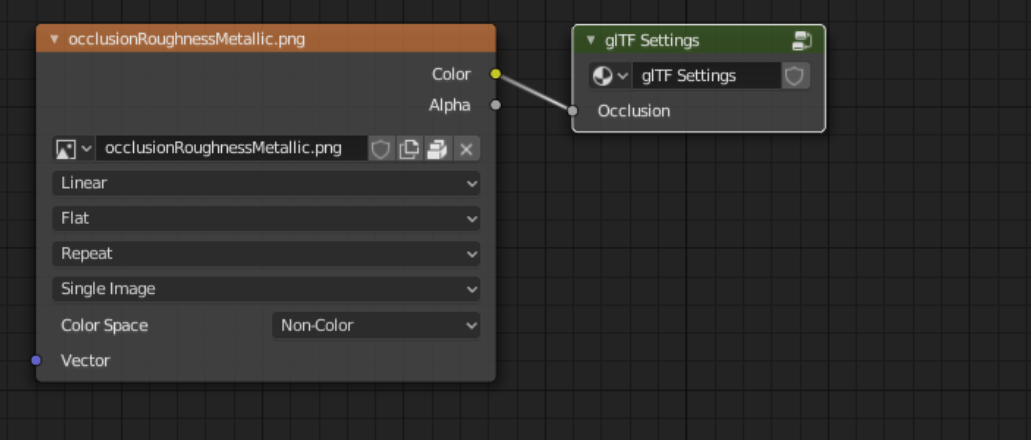
glTF can store a baked ambient occlusion map. A baked ambient occlusion map is a texture that's generated by rendering a scene from the perspective of each geometry. This differs from a normal ambient occlusion map, which is calculated in real-time.
Blender uses the ambient occlusion map to darken areas of the model during rendering to create depth and shadowing on non-self-shadowed surfaces. The default glTF exporter doesn't currently support baked ambient occlusion maps out of the box. However, you can set up your own node group with an input called occlusion and pass it an Image Texture if you want to generate your own baked ambient occlusion map.
Ambient occlusion is typically a pre-computed image that can be used to provide shading information for real-time rendering. It can also be used to provide depth information for z-buffering. Blender has an ambient occlusion feature, but it only works with the OpenGL renderer. There is currently no way to export this from Blender as a glTF ambient occlusion map, making it useless for real-time glTF viewers on platforms or devices where there isn't enough spare power to compute an ambient occlusion map render time.

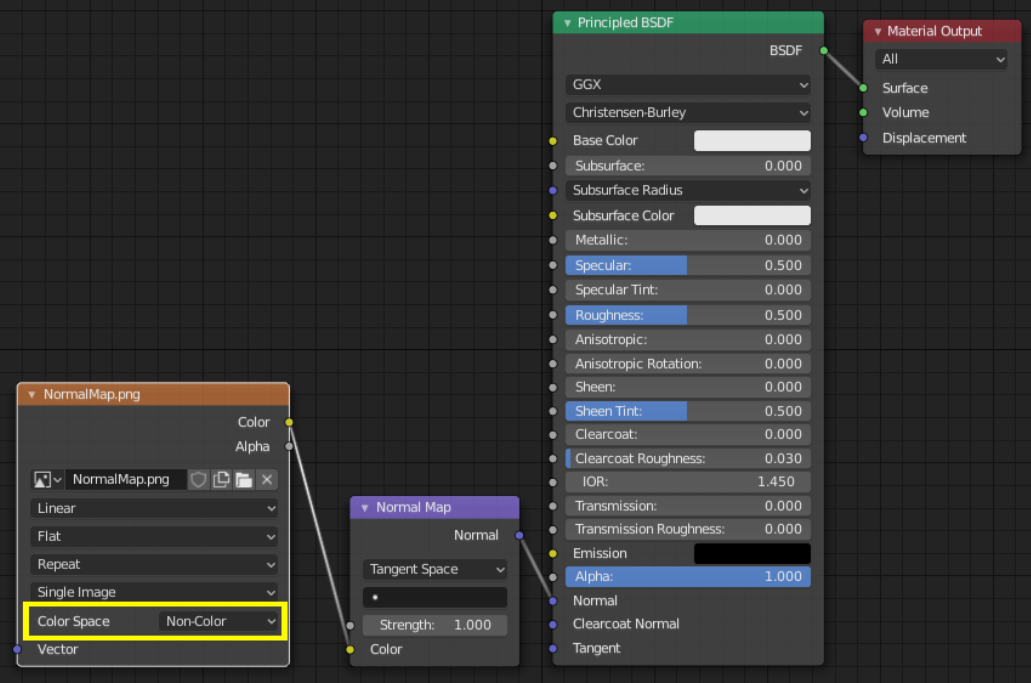
When using a glTF normal map, you should connect the color information from an image texture node to the Normal Map node color input. The Normal Map node's normal output should be connected to the normal input of the Principled BSDF node; the color space on the node should be changed to Non-Color.
The glTF specification calls for the use of tangent space normal maps, so that's what is being exported. You can use the normal map node to adjust the normal map's strength (or intensity).
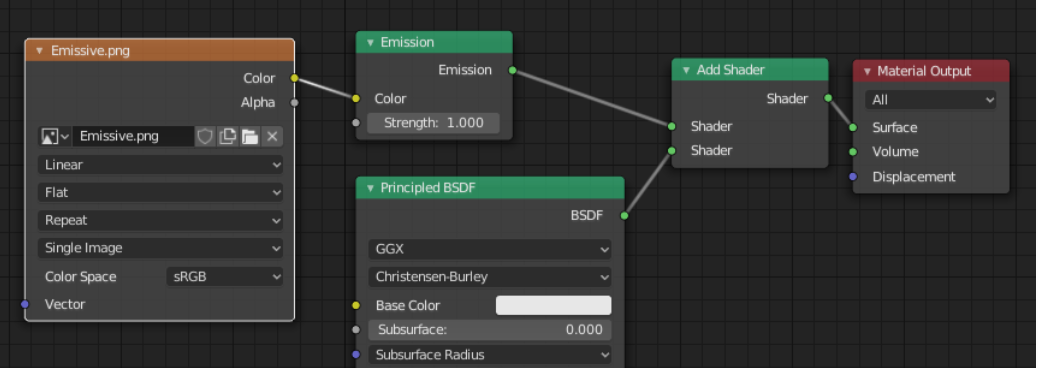
If you want your model to have an image texture, you need to connect an Image Texture node to the Emission shader node.
With the glTF exporter, a material's emissive channel supports PBR shading. If an image is connected to the Emission shader node, then that image will be exported as a material's emissive texture.
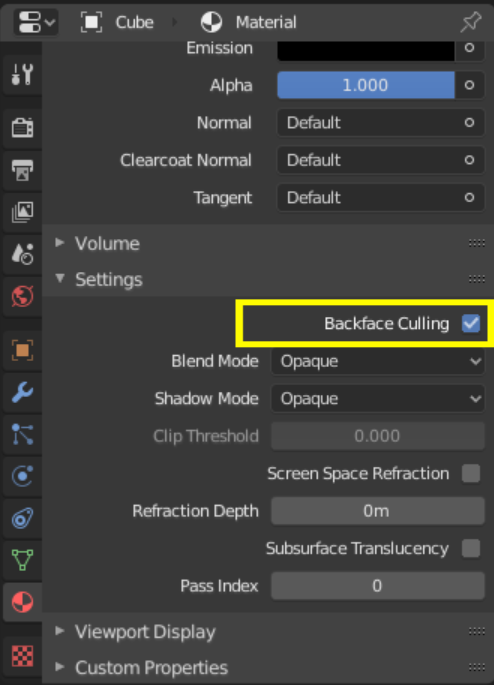
There will be materials where front faces are visible. For this, you need to switch on Backface Culling. This can be done in the Eevee material Settings panel. If you are using other engines such as Cycles or Workbench, you can temporarily switch to Eevee, configure this setting, and then switch back. It would be best if you uncheck this box in case of double-sided materials.
Blender is a very powerful tool that can be helpful whether you are an individual or a studio.
Blender is the only solution free of cost to install and learn 3D design, VFX, and gaming-related concepts developing in multiple aspects.
Beginners or professionals can start learning this to upskill and know more about their 3D artist or designing field. Comparing blender with other similar software in professional standards of modeling, texturing, technical aspects and others.
When you export a glTF model from Blender, you can import it into any other applications that support the format such as the p3d.in 3D model hosting and visualization framework.